SpringとThymeleafでチェックボックスを使用する方法
バージョンについて
この記事で使うバージョンは以下になります。
- Windows 10 Home
- Java11
- Spring Tool Suite 4.6.2
- Oracle 11gXE
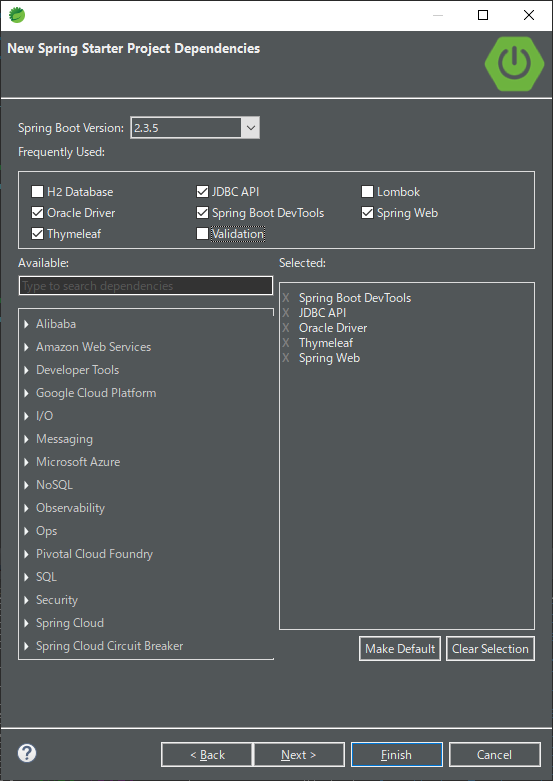
では早速プロジェクトを作成しましょう。今回は最終的にDB登録までやろうと思うので以下の依存関係にチェックを入れます。「Spring Boot DevTools」は任意ですが便利なので依存関係にチェックつけてます。
- Spring Web
- Thymeleaf
- Oracle Driver
- JDBC API
プロジェクトの作成が完了したらDBの接続設定を「application.properties」に記述します。
server.port=8888
spring.datasource.url=jdbc:oracle:thin:@localhost:1521:XE
spring.datasource.username={username}
spring.datasource.password={password}
spring.datasource.driverClassName=oracle.jdbc.OracleDriver
OracleとSpringの接続については以下記事を参考にしてください。

作成タイミングによっては、バージョンが違って動かないなんでこともあるかもなのでpom.xmlを乗っけときます。
<?xml version="1.0" encoding="UTF-8"?>
<project xmlns="http://maven.apache.org/POM/4.0.0" xmlns:xsi="http://www.w3.org/2001/XMLSchema-instance"
	xsi:schemaLocation="http://maven.apache.org/POM/4.0.0 https://maven.apache.org/xsd/maven-4.0.0.xsd">
	<modelVersion>4.0.0</modelVersion>
	<parent>
		<groupId>org.springframework.boot</groupId>
		<artifactId>spring-boot-starter-parent</artifactId>
		<version>2.3.5.RELEASE</version>
		<relativePath/> <!-- lookup parent from repository -->
	</parent>
	<groupId>com.example</groupId>
	<artifactId>SpringTest</artifactId>
	<version>0.0.1-SNAPSHOT</version>
	<name>CheckBoxSample</name>
	<description>Demo project for Spring Boot</description>

	<properties>
		<java.version>11</java.version>
	</properties>

	<dependencies>
		<dependency>
			<groupId>org.springframework.boot</groupId>
			<artifactId>spring-boot-starter-jdbc</artifactId>
		</dependency>
		<dependency>
			<groupId>org.springframework.boot</groupId>
			<artifactId>spring-boot-starter-thymeleaf</artifactId>
		</dependency>
		<dependency>
			<groupId>org.springframework.boot</groupId>
			<artifactId>spring-boot-starter-web</artifactId>
		</dependency>

		<dependency>
			<groupId>org.springframework.boot</groupId>
			<artifactId>spring-boot-devtools</artifactId>
			<scope>runtime</scope>
			<optional>true</optional>
		</dependency>
		<dependency>
			<groupId>com.oracle.database.jdbc</groupId>
			<artifactId>ojdbc8</artifactId>
			<scope>runtime</scope>
		</dependency>
		<dependency>
			<groupId>org.springframework.boot</groupId>
			<artifactId>spring-boot-starter-test</artifactId>
			<scope>test</scope>
			<exclusions>
				<exclusion>
					<groupId>org.junit.vintage</groupId>
					<artifactId>junit-vintage-engine</artifactId>
				</exclusion>
			</exclusions>
		</dependency>
	</dependencies>

	<build>
		<plugins>
			<plugin>
				<groupId>org.springframework.boot</groupId>
				<artifactId>spring-boot-maven-plugin</artifactId>
			</plugin>
		</plugins>
	</build>

</project>
チェックボックスの表示
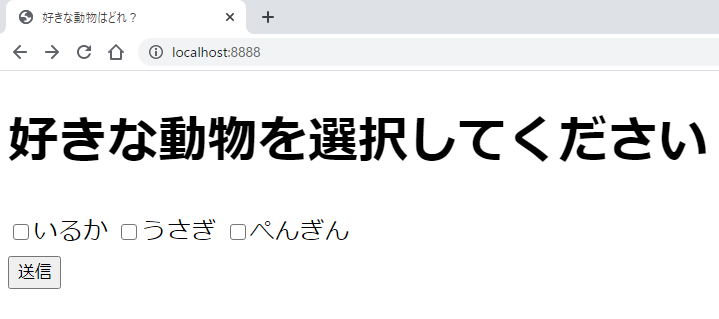
チェックボックスの表示は以下のようなイメージです。
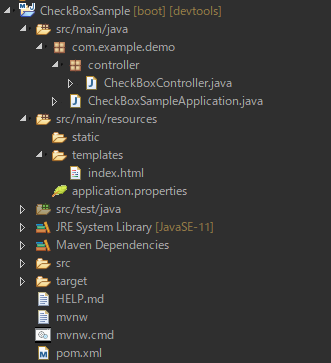
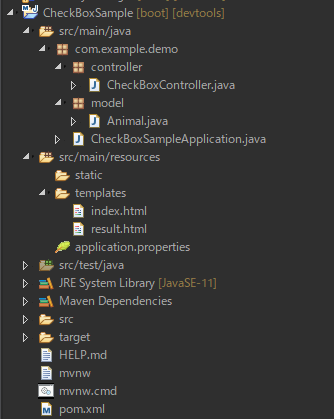
では、作成していきましょう。まず、controllerパッケージを作成して「CheckBoxController.java」クラスとtempatesフォルダに「index.html」を作成します。
CheckBoxController.javaの作成
「getCheckBoxAnimel」メソッドでMapに表示したい文字列とpostした時のvalueの値を設定します。
今回は、MapのKeyが表示したい文字列でValueがpost時のvalueになります。
import java.util.LinkedHashMap;
import java.util.Map;

import org.springframework.stereotype.Controller;
import org.springframework.ui.Model;
import org.springframework.web.bind.annotation.GetMapping;

@Controller
public class CheckBoxController {
  @GetMapping("/")
  public String helloWorldCheckBox(Model model) {
    model.addAttribute("animalCheckBox",getCheckBoxAnimel());
    return "index";
  }
  private Map<String ,String> getCheckBoxAnimel(){
    Map<String, String> checkBoxAnimal = new LinkedHashMap<String , String>();
    checkBoxAnimal.put("dolphin", "いるか");
    checkBoxAnimal.put("rabbit", "うさぎ");
    checkBoxAnimal.put("penguin", "ぺんぎん");
    return checkBoxAnimal;
  }
}
index.htmlの作成
index.htmlは以下のような感じです。
<!DOCTYPE html>
<html  xmlns="http://www.thymeleaf.org">
<head>
<meta charset="UTF-8">
<title>好きな動物はどれ?</title>
</head>
<body>
  <h1>好きな動物を選択してください</h1>
  <form method="post" >
    <label th:each="item:${animalCheckBox}" >
      <input type="checkbox" name="selectedAnimal"
       th:value="${item.key}" th:text="${item.value}"/>
    </label>
    <div>
      <input type="submit" value="送信">
    </div>
  </form>
</body>
</html>
チェックボックスのデータの受け渡し
表示ができたのでチェックボックスにチェックをつけたものをpostで送信してみましょう
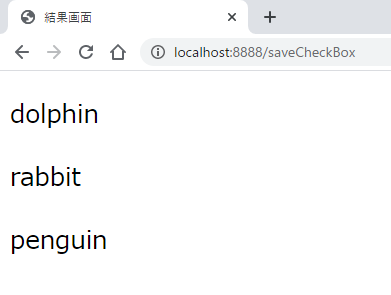
チェックボックスにすべてチェックを入れて送信ボタンを押下した場合、以下のようなページに遷移してvalueの値を受け取れるようにします。
では、さっそく作成していきましょう。まず、modelパッケージを作成して「Animal.java」クラスとtempatesフォルダに「result.html」を作成します。ほかにも先ほど作成した「CheckBoxController.java」と「Index.html」にも修正を加えます。
Animal.javaの作成
チェックボックスは、Stringの配列で受け取れるのでString配列のゲッターセッターの用意をします。
package com.example.demo.model;

public class Animal {
  private String[] selectAnimals;
  public String[] getSelectAnimals() {
    return selectAnimals;
  }
  public void setSelectAnimals(String[] selectAnimals) {
    this.selectAnimals = selectAnimals;
  }
}
result.htmlの作成
後で修正しますが、Controllerで上記で作ったAnimalクラスをanimalとして画面側で受け取って表示します。
<!DOCTYPE html>
<html xmlns="http://www.thymeleaf.org">
<head>
<meta charset="UTF-8">
<title>結果画面</title>
</head>
<body>
  <div th:each="item : ${animal}">
      <p th:text="${item}"></p>
  </div>
</body>
</html>
index.htmlの修正
修正部分は、form部分に「action」属性を追加と先ほど作成したAnimalクラスを「th:object」「th:field」で受け取れるようにしています。
<!DOCTYPE html>
<html xmlns="http://www.thymeleaf.org">
<head>
<meta charset="UTF-8">
<title>好きな動物はどれ?</title>
</head>
<body>
  <h1>好きな動物を選択してください</h1>
  <form method="post"  action="/saveCheckBox">
    <label th:each="item:${animalCheckBox}" th:object="${animal}">
      <input type="checkbox" name="selectedAnimal"
       th:value="${item.key}" th:text="${item.value}"
       th:field="*{selectAnimals}"/>
    </label>
    <div>
      <input type="submit" value="送信">
    </div>
  </form>
</body>
</html>
CheckBoxController.javaの修正
helloWorldCheckBoxメソッドでAnimalクラスを画面側に渡す処理を追加しています。
それとsaveCheckBoxメソッドを新規で追加しています。こちらは、選択されたチェックボックスの中身を取り出して結果画面に表示する処理となっています。
package com.example.demo.controller;

import java.util.LinkedHashMap;
import java.util.Map;

import org.springframework.stereotype.Controller;
import org.springframework.ui.Model;
import org.springframework.web.bind.annotation.GetMapping;
import org.springframework.web.bind.annotation.PostMapping;

import com.example.demo.model.Animal;

@Controller
public class CheckBoxController {

  @GetMapping("/")
  public String helloWorldCheckBox(Model model,Animal animal) {
    model.addAttribute("animalCheckBox",getCheckBoxAnimal());
    model.addAttribute("animal",animal);
    return "index";
  }

  private Map<String ,String> getCheckBoxAnimal(){

    Map<String, String> checkBoxAnimal = new LinkedHashMap<String , String>();

    checkBoxAnimal.put("dolphin", "いるか");
    checkBoxAnimal.put("rabbit", "うさぎ");
    checkBoxAnimal.put("penguin", "ぺんぎん");
    return checkBoxAnimal;
  }

  @PostMapping("/saveCheckBox")
  public String saveCheckBox(Model model,Animal animal) {
    model.addAttribute("animal",animal.getSelectAnimals());
    return "result";
  }
}
DBへの登録
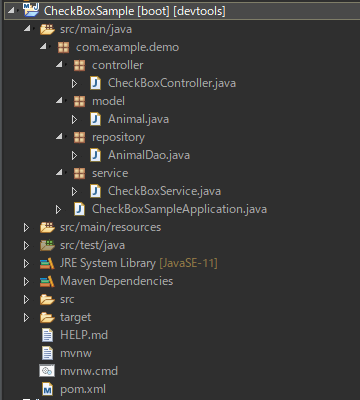
DB登録を作成していきましょう。まず、repositoryパッケージを作成して「AnimalDao.java」クラスとserviceパッケージを作成して「CheckBoxService.java」クラスを作成します。
ほかにも先ほど作成した「CheckBoxController.java」にも修正をくわえます。
AnimalDao.javaの作成
後でテーブルは作成しますが、animalというテーブルにデータをINSERTします。
package com.example.demo.repository;

import org.springframework.beans.factory.annotation.Autowired;
import org.springframework.jdbc.core.JdbcTemplate;
import org.springframework.stereotype.Repository;

@Repository
public class AnimalDao {
  private final JdbcTemplate jdbcTemplate;
  @Autowired
  public AnimalDao(JdbcTemplate jdbcTemplate) {
    this.jdbcTemplate = jdbcTemplate;
  }

  public void insertAnimal(String selectAnimal) {
    jdbcTemplate.update("INSERT INTO animal (name) VALUES (?)",selectAnimal);
  }
}
CheckBoxFormService.javaの作成
画面でチェックした動物を一つずつDBに登録します。
package com.example.demo.service;

import org.springframework.beans.factory.annotation.Autowired;
import org.springframework.stereotype.Service;

import com.example.demo.model.Animal;
import com.example.demo.repository.AnimalDao;

@Service
public class CheckBoxService {
  private AnimalDao animalDao;
  @Autowired
  public CheckBoxService(AnimalDao animalDao) {
    this.animalDao = animalDao;
  }
  public void save(Animal animal) {
    for(String selectAnimal : animal.getSelectAnimals()) {
      animalDao.insertAnimal(selectAnimal);
    }
  }
}
CheckBoxController.javaの修正
修正箇所は、@AutowiredでCheckBoxServiceをインスタンス化させてます。それとsaveCheckBoxメソッドの中でsavaメソッドを呼び出すようにしています。
package com.example.demo.controller;

import java.util.LinkedHashMap;
import java.util.Map;

import org.springframework.beans.factory.annotation.Autowired;
import org.springframework.stereotype.Controller;
import org.springframework.ui.Model;
import org.springframework.web.bind.annotation.GetMapping;
import org.springframework.web.bind.annotation.PostMapping;

import com.example.demo.model.Animal;
import com.example.demo.service.CheckBoxService;

@Controller
public class CheckBoxController {
  private CheckBoxService checkBoxService;

  @Autowired
  public CheckBoxController(CheckBoxService checkBoxService) {
    this.checkBoxService = checkBoxService;
  }

  @GetMapping("/")
  public String helloWorldCheckBox(Model model,Animal animal) {

    model.addAttribute("animalCheckBox",getCheckBoxAnimal());
    model.addAttribute("animal",animal);
    return "index";
  }

  private Map<String ,String> getCheckBoxAnimal(){

    Map<String, String> checkBoxAnimal = new LinkedHashMap<String , String>();

    checkBoxAnimal.put("dolphin", "いるか");
    checkBoxAnimal.put("rabbit", "うさぎ");
    checkBoxAnimal.put("penguin", "ぺんぎん");
    return checkBoxAnimal;
  }

  @PostMapping("/saveCheckBox")
  public String saveCheckBox(Model model,Animal animal) {
    checkBoxService.save(animal);
    model.addAttribute("animal",animal.getSelectAnimals());
    return "result";
  }
}
テーブル作成
create table animal (name varchar(20));
DB登録結果
SQL> select * from animal;

NAME
----------------------------------------
dolphin
rabbit
penguin
ちゃんとDBに登録することができました\(^o^)/



コメント